
How's your week been going? Great I hope! I've had a fun week. Last week I told you about the autograph books I was going to make for the Grandkid's trip to Disney. I got the idea from Lauren's Creative blog which you can see here . Well, I was able to get them both finished! I had a great time doing them and I'm totally stoked about how they turned out! I have so many pictures to share that I'm going to do two posts on them. :)
So off we go now on my autograph book adventure..........
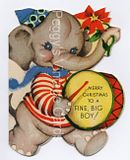
This is the front of the autograph books.

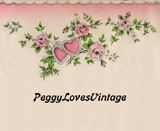
This is the back of the autograph books.

I decided I'd connect the pages in a zigzag pattern. I used standard white card stock and cut it in half on the 11 1/2" side.

You could cut it on the 8 1/2" side but I wanted the individual pages to be longer then wide. I then folded the sheets in half.

I wanted each sheet to have a little pocket so I applied the glue in a "U" shape - only along the sides and bottoms of the sheets.

It was pretty easy to do this and line the sheets all up because I was able to slide sheet two into the fold for sheet one. That made it really easy to keep the two sheets apart until I was ready to slide it in place.


This method created a nice little pocket for momentos or additional signature tags or journaling tags.

Here's a top down view of the completed zigzag.

A front view of the completed zigzag pattern.

A back view of the completed zigzag pattern. I left this side blank for now. Once the trip is finished, I plan on using some of the many pictures of the trip to complete this side of the book.

Before I started decorating the sheets, I attached a very long ribbon across the height of the first sheet. I wanted to be sure it would be long enough to tie once both sides of the book are complete.

Oh! One word of caution, before you complete the layouts - when you're creating the zigzag and attaching your folded sheets together make sure you do it so that on the completed zigzag both the front and the back open from the right side. If you start the first half sheet by placing the glue on the inside back and then keep the number of half cards even you should end up correctly. But it sure doesn't hurt to double check to make sure they both open from the right side before you get them all decorated. :)
So now with all the mechanics covered here's the completed layouts for Kaiden's autograph side of the book.


I attached ribbons to the tags to make them easier to pull out of the pockets and I left the back sides of the tags blank so that they could be used for additional signatures or for journaling.


So what do you think? I'm totally pleased with myself! LMBO
Now, if you haven't already make sure you check out Jordan's autograph book. Her's is full of Princess' of course!
Have a great week, plumb full of smiles!
Peggy


Oh gosh sis!!! These are fantastic!!! I'm going to have to make some of these for the boys for when they go this summer! Awesome job and awesome tutorial! The characters are all so cute and I love how you've detailed them out! Gorgeous! They're going to love them!!
ReplyDeletelove and hugs!
WOW! Dang girl! These are awesome works of art! The "signers" will want to look at these books before they sign their name! LOL! The kids will love them! GREAT job girlie!
ReplyDeleteOh WOW, Peggy! What a fabulous keepsake this will be! Now I want one! Too cute for words! xxD
ReplyDeleteWow Peggy!!! These are really awesome looking books!!! You just gave me inspiration for my grandkids' books. Thanks!!! Mimi
ReplyDelete