
Hi Everyone!
Today I'm being totally lazy..lol. I'm just sitting around reflecting on all the Christmas activities and being thankful that's it's over and yet still basking in all the joy and warmth that occurred during the busy days.
This whole month has been totally crazy with so many unexpected happenings that it truly seemed like everything was going amiss and I was beginning to wonder if Christmas this year was meant to be.
It all started with Hubby's Dad getting sick which was a major blow to all of us. Then the stomach flu started spreading throughout the family with Kaiden being the first lucky recipient. And how lucky am I? He was spending the night at Grandma's when the ugly beast reared his head! lol Then Dad's car completely broke down, with one of the front wheels pointing to the left and the other pointing to the right - makes it kind of hard to drive. lol. Next, Jordan caught a cold and developed Pink eye. Then on Christmas Eve our main toilet thought it might like a vacation. We decided that couldn't be the case and it just had to be fixed. Then Christmas morning, we awoke to the water heater having issues and going on a strike. Oh my gosh, I thought we were never going to make it through the holiday! It has been quite exciting and taxing! But you know what, it still could have been a lot worse!
Even with all this going on, we did manage to get the shopping done, the presents wrapped, a few crafts plus some cookies and chocolate pretzels made, and two major dinners prepared for the family. Whew! What an accomplishment for first 3 weeks of December!
So now that the holiday is over I can share with you some of the crafts that we completed this month.
Every year one of my objectives for November/December is to make ornaments to add to my tree and to share with my loved ones. This year for some reason, it was really difficult for me to decide on what kind of ornament to make. It was really a struggle until I saw this on Julie's blog. The idea hit me that if I expanded on her design and put the wreath on the front and back it would make an awfully pretty Christmas ornament. So I followed Julie's advise and visited here to watch the tutorial. The tutorial was wonderful and after just a few practice ones I had it down pat and was braiding away. lol I think I wound up making about 50 of them but once I got it down pat they went pretty fast. Here's just a few of the creations.

I made a sheet of about 2" medallions and printed it twice. I then cut them out and added some glue to back of one and a hanging ribbon and then I sandwiched the two images together. Being careful to match, as close to possible, the placing of the hanging ribbon on both sides. Then once the braid was complete, I attached it with glue to both sides of the medallions. I added a little bow and some embellies and they were done. On the little kid's ornaments, I used alpha beads to spell out their names and for the older ones I just embellished with things I had on hand. I thought they turned out nice. I really loved the Madonna with the blue ribbon and the deer with the brown ribbon.
A couple of months ago I purchased these from a well known company that sells candles at home parties. I bought a set of 3 different sizes and they were very expensive.

Once I received them, I thought I could basically create the same thing but in a smaller size for a lot less money. So as I was doing my shopping, I kept an eye out for something that I could use to recreate it. I found a vase at the local dollar store that I felt would fit the bill. I then started running across blogs that discussed glass etching. I've always wanted to give that a try so I started investigating the various ways that patterns were transferred to the glass. Most of the samples were using vinyls that were cut using the various cutting machines. But I'm not lucky enough to have one, so I settled with using one of those little pink stencil sets that you find everywhere. I picked a snowflake pattern and then cut the stencil apart for the different snowflakes. I used good old Elmers Spray Adhesive to attach the stencils to the glass and then filled in the stencil with the Amour Etch solution. I waited 5 to 10 minutes, then rinsed it off and washed it really well. After a few uses, the stencils were a little gummy from the glue but they continued to work just fine.


After all of that, I filled them with the scented pine cones and potpourri and sparkly ribbon and this is the completed project.

It's kind of hard to see the snowflakes but they're there if you look really close. I ran out of time and didn't find the votive candle holders that should rest on top, but maybe next year, I'll include that in their Christmas packages. lol But all in all, I was really happy with the finished project and hope to do more etching in the future.
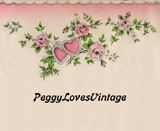
Now sadly, my last project, I didn't get a picture of before it went into the mail. For this project I purchased some flour sack kitchen towels and using fabric transfer sheets, I added some cute borders along the width's edge. In order to get the border to go all the way across I had to have 3 rows on the 11" side of an 8.5 x 11 sheet of fabric transfer paper. So I made sure I picked a patten that had a break that I could easily match up. I picked an image that lent itself well to repeats and I also mirrored image it so that there was more variety in the image. I had planned on adding some cross stitch X's on top and below the image but alas, that was another project that I didn't get to really finish. But I thought they turned out pretty cute even without the cross stitching. So to share, here's one of the images that I used for my pattern on the towels. Make sure you click on it so you get the full image size.

Take care and I hope you have a week plumb full of smiles!
Peggy


Just a quick note to let you know that a link to this post will be placed on CraftCrave in the Cutting category today [27 Dec 01:00am GMT]. Thanks, Maria
ReplyDeleteWOW! I'm so far behind on my blogging...I've missed lots of fun here. So sorry to hear of all your hard times, but it seems you pulled thru and enjoyed the season anyways! *wink*! Love all your projects, thanks for sharing them with us! HUGS! :)
ReplyDeleteBeautiful!!! It all turned out so wonderful, sis!! I'll get a pic of the towel for you to post. I love it! Sorry you had such a hard time, but as you said, it could have been much worse!! Love you! Happy New Year!!!
ReplyDeletehugs, me!
Thank you for the image. I have the perfect paper to make a card with this.
ReplyDelete