Valentine's is one of my favorite holidays. I guess because it's a day full of love. A day that helps us re-enforce the love we have for our family and friends. I think sometimes we get so busy that we forget to stop and say I love you to the ones that mean the most to us.
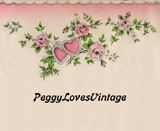
So I thought we'd have a little fun with it and I'd sponsor a little contest. Here's one of my favorite heart images. Use it in any kind of craft project you like - card making, fabric transfer, decoupage, whatever. Leave a comment and include a link to your finished project or email an image of it to me by midnight CST February 12th. A randomly selected winner will be able to choose any 2 cutouts from my store.

I decided I'd make a digital card. I used Photoshop Elements 6 to complete the images. I just love this package and all the flexibility it gives you for editing images. What I don't like about it is the color of the drop downs and the text. Why on earth they would select a dark grey background with black text I have no idea. It makes it extremely difficult, if not impossible, to see what's contained in the drop down.
To start, I added the two frames. I don't know how most folks do it, but I use the crop function and of instead of making the image smaller I make it bigger :). I used the eye dropper to select the pink from the center of the heart than I used the paint bucket to assign it to the new cropped area. I then repeated the crop to create the red border and used the eye dropper to select the red from the rose buds and the paint bucket again to assign the color to the new border. The clone utility was used to copy the corner rose buds and the ribbons from other card images to the pink border. Instead of using shadow brushes to create the drop shadow on the text, I selected the text using the rectangular selection tool and created a duplicate layer. Then I used the magic wand tool and selected the text, changed the color of the text and then drug it to the appropriate spot on the main text to give it the shadow affect. In the red border I used the Faux Finish Brushes- mesh to create the little squares. Once I had them all created I used the heart custom shape tool to put the hearts in the center of the square mesh. Last but not least I just used a small round brush to create the white border around the pink frame. I think it turned out pretty good.

For the inside, the only thing I've done so far is assign a 70% opacity to the main image and typed in my sentiment. I'll add more before I finally attach it to the card.

You may have noticed that I haven't finished my card yet :) I intend to add some lace and then attach them to card stock. I'll include a picture of the completed work next week.
So come on now, get busy and share your project by leaving a comment.
Hope your week is full of smiles!
Peggy


Beautiful heart, Peggy!! And love your card! Can't wait to see it when it's finished! I'll get busy on mine. Love ya!!
ReplyDeleteOh Peggy this is beautiful love the image and the gorgeous card you've created!
ReplyDeleteI'll start on mine this week!
Hugs
Juliexx
This comment has been removed by a blog administrator.
ReplyDeleteYAY! A contest! I'm working on my card right now! Yours is awesome Peggy! You are one creative chicky! THANKS for all the freebies too! HUGS!
ReplyDeleteFABULOUS card peggy...I might have to give this a try myself...hugs
ReplyDeleteI'm so glad I found your blog! My grandgirls and I do cards and crafts every Friday. They too have been crafting since they were 2, Mia now 7, Zoe 6, Kya 3. I have been crafting with vintage images for 20 years, love your images.
ReplyDeleteThis comment has been removed by a blog administrator.
ReplyDeleteWow Peggy! I am glad that you Love Vintage! Thanks for the beautiful heart -- here is what I used it for. Thanks for the chance to "win" from your store.
ReplyDeleteThis comment has been removed by a blog administrator.
ReplyDelete