Sunday, December 27, 2009
Merry Christmas and Happy New Year
What a quiet peaceful Sunday! Snow is falling and the ground is covered, such a beautiful site. We didn't have a white Christmas, but it sure is making up for it now. The grandkids will get to make use of those nice warm gloves and hats that they found in their stockings!
I hope your Christmas was full of family and good cheer with lots and lots of smiles. We spent Christmas Eve at my daughter's where she served her first holiday dinner. She did a very good job and I'm very proud of her. Everyone had lots to eat and a good time was had by all.
Christmas day is always crazy around here. We usually celebrate in the evening which gives the kids time to play with their toys from Santa and to visit other grandmas and grandpas. Our dinner tradition is homemade lasagna, a huge salad and homemade bread. It was yummy and the cherry and pumpkin pie just finished it off nicely. We had eighteen for dinner, so it was a full house with lots and lots of noise and happy faces.
I would like to welcome Julie Huxter to the designer group. I love her designs and am always ooing and awing over them. If you haven't visited her fantastic blog take a trip over there and check out her designs
HuxtersHouse.
I hope your New Year brings lots of joy to you and yours, that your family is healthy, safe and prosperous throughout the coming year.
I wish to thank all my family, friends, designers, customers and readers for the wonderful year I've had. I look forward to spending the next year with each and every one of you.
Merry Christmas and Happy New Year to all and to all a goodnight!
Peggy
Sunday, December 20, 2009
Merry Christmas Project
Well, Christmas is almost here. It's snowing today, nothing like out east, but off and on there's flakes in the air. We're supposed to get more later in the week, just in time for a white Christmas. The grandkids are full of anticipation just waiting for Santa to get here. I just love this season!
Every year I do some kind of Christmas project. I waited till now to post my project because I wanted it to be a surprise for the recipients. I know they've all received them, so now I can share.
This year I decided to create a calendar. I thought that it would be something that I could whip up pretty quickly, it was something that everyone could use and could also function as our Christmas Card for family and close friends. Sounds good right... but it turned out to be a bigger challenge then what I had anticipated.
I'm not really a card creator. I leave that job to my sis who does wonderful work and I'm sure a lot of you know who she is and are well aware of her talents. But anyway... this year instead of doing my flat, created in a hurry, PC generated cards, I decided to be a little more creative. I had most of the supplies I needed on hand. I did have to purchase some black card stock. some foam dimensional squares and some embellishments. I had a pair of scissors that cut with the pattern, so I could add some interests to the edges. So with the white card stock I had on hand, I was ready to start my adventure.
I have a Santa image that I just absolutely love! I'm a Santa fanatic and this image is my most favorite of all! He was selected to grace the front of the calendar. The striped paper with snowflakes in the Poinsettia and Snowflake digi paper group (listed in both my ebay and etsy stores) was selected for the front and the last page of the calendar.
I cut a square of the black card stock using the special scissors and pasted the Santa image in the center.
I also have a holly digi paper which isn't listed yet but one of these days it will be in the stores. I used this holly paper for the frame. In order to save ink, Photo Shop was used to the create frames with white centers. I cut the outside edges of the holly frame with the special scissors and the inside of the frame with regular scissors.
Then using the black card stock and the special scissors, thin strips were cut and pasted on the inside edge of holly paper frame.
Foam dimensionals were added to the back of the holly frame to pop the whole thing up from the Santa base.
Flowers were attached to corners of the frame.
Here's the finished front.

The whole piece was then glued to the striped snowflake paper and walla all done... with one that is. Only 15 more to make.... Here's the whole front page all put together.

I found this wonderful site full of quotes for the various seasons and months. So I selected a quote for each month and then searched my images to find one that supported the quote. Here's the site for the quotes if you're ever in need of one. Quotes Using Photo Shop the image and the quote were combined into a single .jpg image.
Here's January's and December's page with the image and quote completed. Click on the image and you'll be able to see an up close view.


Photo Explosion was used to create the individual calendar month images and each month was saved as .jpg so they could be edited.
I found a web site that had all the holidays listed. This was a great help in identifying dates like Mother's Day, Father's Day and Easter. Here's the link for that site if you're ever have a need to determine a date. Special Holidays
Using Photo Shop, notations were added for the holidays throughout the year.
I selected images to use on extra special holidays. Using Photo Shop the images were re sized so they were really tiny and were then added to the months .jpg images. So here's the finished January and December pages. If you click on the images you'll get an up close view.


A three hole punch was used for the holes on the top also for the hanging hole.
After several false starts, I finally settled on using a rope ribbon to tie the whole package together. Originally, I thought that jump rings might work for this but on the test calender the weight of the paper on the ring seemed to rip the holes. So the rope ribbon seemed to be the better choice. Make sure to leave extra room with the ribbon so that the calender can be opened all the way and show both pages for a month. I struggled with this on the first one. But I found that if I placed a pen on the top and wrapped the ribbon around the pen and then tied it, there was just enough ribbon to fully open the calender without crimping the paper.

Once all the holes were tied, I was able to easily pull the pen out. A drop of glue was added on each knot to help keep it tied.
As a result of the jump ring failure, I thought it might be a good idea to reinforce the holes on at least the first few pages. So I added a little strip on the bottom of the page before it was three hole punched. This made the card stock stronger to help keep the holes from tearing.
So here's how a completed page will look when it's hanging up.

My goal was to create 15 calendars which really meant 360 pages, counting the front and back of each page. So just a small word of caution, because I used so many images and had so many to make, it took me 16 hours to complete the printing and 2 cartridges of ink. This of course included several reprints because I reloaded paper wrong (smile) or the holes where put on the wrong edge or the paper wasn't lined up in the hole punch correctly etc. You know, just those little mess ups that frustrate the dickens out of you.
All in all, it was a fun and a challenging project. I was pleased with the completed project and hope my family and friends enjoy them.
Have a wonderful Christmas and I hope it's just plumb full of smiles!
Peggy
Sunday, December 13, 2009
Chef Jordan and Printing Tips
Wow! Christmas is quickly approaching. Are you ready? I'm not but I guess I'd better hurry up and get going. Christmas sure won't wait for me!
My granddaughter, Jordan, has been a big help this year. She's a whole 5 years old, but I swear she has an old soul! She just loves to help grandma cook. This weekend we did chocolate chip cookies and chocolate covered pretzels. We had great fun and ate cookies and pretzels till we were so stuffed we couldn't hardly move. So I've got a good start on that 5 lbs coming on the ole bod this Christmas (smile). But it was well worth it. Now, I just have to do the Russian Tea Cakes, 2 more batches of Chocolate Chip cookies, maybe some Spritz's, fudge and toffee and finish the shopping and wrap the presents and make Christmas dinner and ... not too much... lol.

I've finished my Christmas project and they'll be in the mail tomorrow. Maybe I'll be able to show it next week. I really enjoyed doing it, although it did turn out to be more work than what I thought it would be. I'll give you all the details when I post the project. Needless to say, I surprised myself... that's always good when you can accept a challenge and feel like you succeeded at it, but more on that later.
So this week, I thought I'd talk a little about printing images. One thing I hear quite regularly is...Gee I love your images, but my printer does a nasty job, would you print them for me? I try to avoid doing that, it takes a good sob story for me to relent. Truthfully, I'm a smoker and I'm always concerned about someone being sensitive to the smoke. So I avoid it as much as possible. Everything I create is stored in plastic bags with Bounce dryer sheets which seems to do the job. But I just prefer not to risk it.
So anyway, back to the subject of printing. I have an old Hp Office Jet 970 cxi. It has printed out more than 70,000 pages and it's still going strong. I just love this printer. I've tired several other different types of printers but I haven't found one yet that pleases me more. So if you're ever in the market for a new/old printer keep your eye out for a 970cxi. I'm sure you'll probably only be able to find used ones, but keep in mind the 70,000 pages my printer is at. It's like the energizer bunny it just keeps on going. I know you will be pleased with the printing.
Have you ever checked out the preferences tab when you issue a print request? After you select print you should get a window that looks maybe something like this.

It's kind of hard to see but preferences is listed there in about the middle of the screen. Go ahead and be courageous and click on it and you'll see a screen that looks like this.

The Media box will probably have plain paper listed in it and it will probably have normal selected in the Quality Setting box. These two entries play a big role in how your printed image will look. Go ahead and click the down arrow in the Media box. You'll see something that looks like this.

There will probably be lots of different media selections to choose from. I usually select HP Bright White over other types unless I'm actually printing out a photo and want it on the actual Photo paper. But, for printing on card stock or when printing CD labels, I always select Bright White.
Now the Quality setting is just a tad bit different. Most generally I'll select Best but on some images Best is too much, so Normal is better. It just kind of depends on the colors that are in the image and how bright and vibrant they are. Sometimes Best puts too much ink and Normal is good enough. It's kind of judgement thing.
So I guess the point is, if your printer is not producing images that you're happy with, try playing with the preferences settings. Pick different types of paper - even if it's not really the kind of paper you're using - and different types of quality settings. Check out the results. If you like the way it looks, wright them down somewhere. Now, the next time you encounter a similar image or use a similar paper you'll know exactly what settings to select in the preferences. Remember that best will always use the most ink and draft will always use the least.
Don't be afraid to play. Your changes will only be good for the current print request and they'll be back to the default settings the next time you select print.
I hope you have a great week that's just plumb full of smiles!
Peggy
Sunday, December 6, 2009
Just the cutest idea and free Christmas gift tags!
I just have to tell you about this WOW! idea from a fellow Etsian, picklebelle. For her daughters second birthday she wanted to do a puppy theme, so she was looking for little girl and puppy images. So we worked together and came up with a good selection of images. Now, check out what she accomplished!


The pictures don't really show the detail but she used the images in the ceiling decorations, on the cake and also on the cup cake flags.
I think she did a super fantastic job! She's trying to start up a party package shop in Etsy. Here's her link if you'd like to contact her picklebelle
With Christmas quickly approaching, I thought I'd share a couple of my gift tags with you. Feel free to save and print as many as you like. I have a CD with all kinds of Christmas gift tags. It's not listed in any of the shops at the moment but if you're interested in it just contact me.


I hope you have a wonderful week that's full of smiles.
Peggy
Tuesday, December 1, 2009
Actual Size vs Best Fit Viewing of Images
I hope everyone had a safe Thanksgiving and if you participated in Black Friday that you got all the great deals that you wanted. Personally, I'm not a Black Friday participant. I just can't get into that get up early and stand out in the cold mode. I've always been a night owl, maybe one of these days they'll have the Midnight to 4AM sale. I think I'd be there for that one (smile).
Procrastination central here! lol I guess it's a really good thing that I didn't choose Journalism as a career path. I'd sure be in trouble! I've had a terrible time this week figuring out what I wanted to blog about. I had several ideas but nothing that I really got excited about or was prepared enough to share. Guess, if I wrote for a living, I'd say I have a bad case of writers cramp. (lol)
I do have a tip/trick for you though. Have you ever received a digital image and went to look at it and it was huge? You have to scroll to the right, then scroll down and scroll back to the left, then down again and continue to do so until you've viewed the whole image. What a pain and it really ruins the experience!
What you might not realize is that you can fix this problem. It really is an issue of how you are viewing the picture/image. Every image viewer that I've run across has an option which is some combination of view actual size or fit to screen or best fit or something that like. Sometimes you'll find it in words, other times it's an icon selection. But I guarantee that the option will be there. Just hunt it out and make sure you set it to fit to screen, then all that scrolling will go away.
For example I use the Windows Picture and Fax Viewer software a lot. It comes up quickly and I can zoom in and out with ease and quickly print any image that I'm working with. Here's how you switch between Best Fit and Actual Size on it.
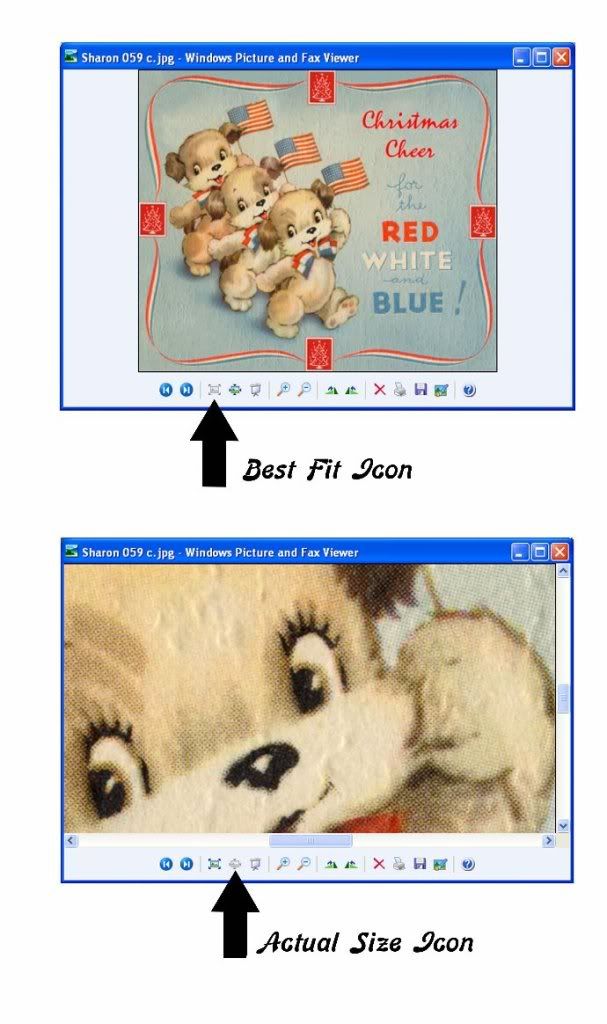
So look for the fit to screen option, it will be there whether it's a Windows application or an image editing application. It's a true life saver!
Have a great week full of smiles!
Peggy
Procrastination central here! lol I guess it's a really good thing that I didn't choose Journalism as a career path. I'd sure be in trouble! I've had a terrible time this week figuring out what I wanted to blog about. I had several ideas but nothing that I really got excited about or was prepared enough to share. Guess, if I wrote for a living, I'd say I have a bad case of writers cramp. (lol)
I do have a tip/trick for you though. Have you ever received a digital image and went to look at it and it was huge? You have to scroll to the right, then scroll down and scroll back to the left, then down again and continue to do so until you've viewed the whole image. What a pain and it really ruins the experience!
What you might not realize is that you can fix this problem. It really is an issue of how you are viewing the picture/image. Every image viewer that I've run across has an option which is some combination of view actual size or fit to screen or best fit or something that like. Sometimes you'll find it in words, other times it's an icon selection. But I guarantee that the option will be there. Just hunt it out and make sure you set it to fit to screen, then all that scrolling will go away.
For example I use the Windows Picture and Fax Viewer software a lot. It comes up quickly and I can zoom in and out with ease and quickly print any image that I'm working with. Here's how you switch between Best Fit and Actual Size on it.
So look for the fit to screen option, it will be there whether it's a Windows application or an image editing application. It's a true life saver!
Have a great week full of smiles!
Peggy
Subscribe to:
Posts (Atom)