How have you all been? Are you busy creating or just wishing you had the time to spend on creating? It seems like this time of year the bug grabs a hold of me and I really feel the need! The weather here has been cloudy and rainy and chilly so its perfect for just staying in and keeping cozy warm.
Anyhow, as I was meandering around different blogs I ran across a really cute idea and tut on making luminaries from recycled boxes - sure wish I'd save the link but hind site is always better than foresight lol.
You know the reuse/recycle kind of stuff that my dear friend DeeDee does. She's always so cleaver! I used a brownie box and a mac and cheese box. You basically, very carefully, take the box apart so you can turn it inside out which gives you the blank chip board to work with. The tut showed how to take a piece of paper that is the correct size for the face of the box. Fold it in fourths and then cut a design for the face of the box, kind of like making the paper snowflakes. Trace the pattern on the box and cut it out using an Exacto knife or scissors.
It would probably be wise to have a basic idea of what image you're going to use for the luminary so that the cut out will be big enough to properly display the image. Now you need to think of how you're going to light it up. Of course real candles are a nono, but the little LED lights that are everywhere would work wonderful. I elected to use little battery operated tea lights. I liked the way they flicker and give the feel of a real candle. Once, you decide how you're going to provide the light, cut a hole in the back of the box that will be big enough to allow the lighting source to be put in the box but not so big that it will let a lot of the light escape.
Now it's ready to be decorated. I choose to use acrylic paints but inks, charcoal or markers could be used to dress up the box. Once decorated, it's time to put the box back together. I found this to be the hardest part because the edges kept pulling themselves apart. I was using tacky glue and a glue gun would probably have been better but I didn't have mine so tacky it was. After about the third try, I decided to try and hold it together with rubber bands and put a weight in the box to help hold down the edges. This worked wonderfully and the edges finally sealed.
Oh one other thing, because of the size of the boxes I used, I needed 3 of the little tea lights in the box in order to have enough light shining through. All in all, it was a fun project and I intend to make some with a Christmas theme, It's easy enough that the grandkids can make some also. But I think I'm going to try something a little bit different. Maybe I'll be able to try it and let you know the outcome with my next post.
Now don't laugh... lol Here's my experimental luminaries...

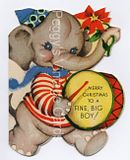
Ok, enough of that. Is it too late for another Thanksgiving image. I know I'm cutting it close for my Military families, but maybe you can still use it for this year. This is another card from my Provencher collection. It was originally a Christmas card, but I associate Turkey's more with Thanksgiving than Christmas. Our traditional Christmas dinner is Lasagna - so much easier than a turkey and it can be made ahead of time :)
So enjoy, and make sure you click on them before you save them.


One last thing, I'm looking for a MAC follower that would like to help me out. I'm trying a new download process for my CD's and I need a Mac person to try it out and help me create documentation on the process. If you're interested let me know via a comment or an email. So if you're a Mac user and savvy with your computer and would like a free CD be sure and contact me.
Have a great week, plumb full of smiles!
Peggy